Version of this document in pdf format
1.0 Basic settings required to get data
The settings related to triggering must be adjusted before the VXI cards will produce any data. The 3 adjustments described here apply to all 3 types of Ge card: EG phase 1, Clover and Cluster cards. The relevant adjustments are:
• Fast Trigger Sample
• Validation Sample
• CFD Delay
Sample point adjustments may be made with pulsers, sources or in-beam. CFD delays should be adjusted with pulses or sources as described later. The sample points determine the delay from the CFD firing ("CFD Direct" inspection point) to the sampling of the global Fast Trigger and Validation trigger pulses. If either sample is not in coincidence with the relevant trigger pulse then the channel’s Local Trigger (LT) will clear itself down and wait for another event. Normally the same values for the sample points can be used for all channels (you can use "act on all channels" and "act on all segments" buttons to put the same value in all channels).
However, it is still necessary to check that each channel is correctly adjusted by looking at the logic inspection points as described below:
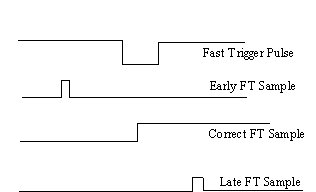
1.1) Method for Fast Trigger Sample points
1.1.1) Connect the channel’s FT Sample to one logic inspection line.
1.1.2) Connect the Fast Trigger pulse to the other logic inspection line.
1.1.3) Trigger the oscilloscope using Fast Trigger pulse and adjust the FT sample slider until the front edge of the FT sample is in the middle of the Fast Trigger pulse.
1.1.4) Save the results in a setup file using the save/restore feature.
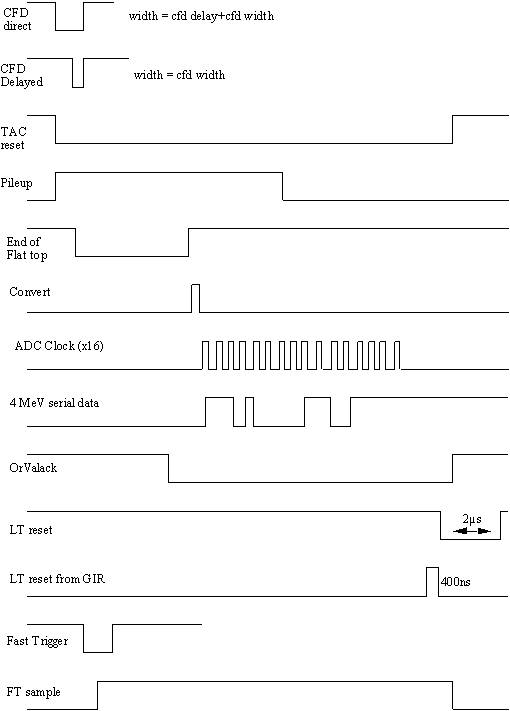
In all the following diagrams, the logic levels are what you will see on the oscilloscope, when looking at a Cluster Ge card’s inspection lines at the front of the resource manager, i.e. FT pulse is normally 0V and when active is -0.8V into 50Ω (fast NIM).
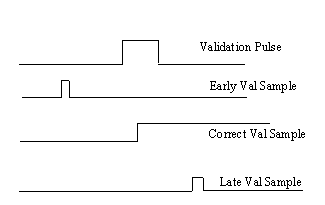
1.2) Method for Validation Sample points
1.2.1) Connect the channel’s Validation Sample to one logic inspection line 1.
1.2.2) Connect the Validation pulse to the other logic inspection line.
1.2.3) Trigger the oscilloscope using the Validation pulse and adjust the Validation sample slider until the front edge of the Validation sample is in the middle of the Validation pulse.
1.2.4) Save the results in a setup file using the save/restore feature.

When the sample points are correctly adjusted, the sample point’s inspection lines will show their signals extending until the LT reset signal becomes true.
The CFD delays may be adjusted after setting up the FT and Val samples. For multiplicity 1 (source) events the setting doesn’t matter, but for coincidence events (in beam) the CFD delay setting must be correct or else some channel combinations may fail to generate a trigger. CFD delay refers here to output pulse delay. The delay and fraction of the CFDs themselves cannot be adjusted.
1.3) Method for CFD delay
The CFD delay is used to time-align the CFD output pulses which drive the sumbuses. These must be time-aligned so that they are coincident at the input to the trigger card, not at the output of the Ge card logic inspection lines so as to take account of cable delays between the Ge cards and the trigger cards.
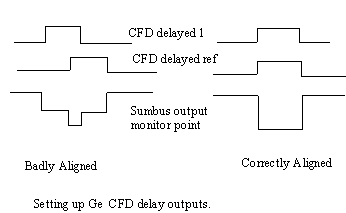
1.3.1) Select one channel from an EG phase 1 Ge card, not a composite detector (note 1), as the timing reference and set its CFD delay to mid-scale.
(NB CFD width + CFD delay = 255ns max., so the adjustment for CFD delay is only 255ns-CFD width, i.e. 205ns for a width of 50ns, hence mid-scale = 100ns, not 125ns.)
1.3.2) Connect one NIM tail-pulser (PB-4 or similar) to both the channel to be adjusted and the reference channel.
1.3.3) Connect the sumbus monitoring output of the trigger card (available from the front panel or on an analogue inspection line) to an oscilloscope.
1.3.3) Adjust the CFD delayed slider of the channel being set up so that the sumbus pulse contributions for the 2 channels are exactly coincident and therefore generate the maximum possible sumbus pulse amplitude on the sumbus monitoring output.
1.3.4) Repeat this procedure for each channel in each card, saving the results periodically in a setup file using the save/restore feature.
There are other methods which could be used, for example using a source, a fast scintillator and a TAC. The TAC would be started by the sumbus going over threshold in the trigger card (using a logic inspection line) and stopped by a delayed version of the scintillator. Each channel in turn is enabled and used as the TAC start to accumulate a spectrum. The peaks of the spectra would be adjusted to be coincident using the CFD delayed adjustment sliders. The TAC could be part of an MCA, however such a TAC is also provided in the Trigger card. This setup procedure could be automated.
Note 1: the composite detectors (Clover and Cluster) have simple on or off sumbus outputs switched by a logic OR of all their CFDs, regardless of how many fired, because they are regarded as a single detector with several elements. Clearly if an element of a Clover (or Cluster) detector is selected as the timing reference, then its neighbouring elements cannot be adjusted by the method described here because they will not increase the sumbus output level.
(The Cluster Ge card also provides a true sumbus output which indicates the number of crystals hit within the detector by increasing output levels, but this should not be used in Euroball because Euroball treats each group of 7 crystals as one detector.)
2.0 Settings to match Ge electronics to its associated preamplifier
Each Ge channel’s shaping amplifier must be matched to the detector’s preamplifier by adjusting the pole-zero and either the pileup threshold or the peak detector gates as described below. These adjustments should be made using a 60-Co source.
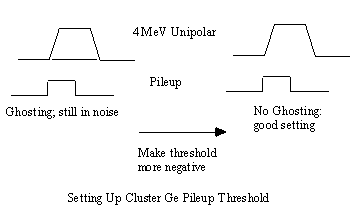
2.1) Pileup Threshold (Cluster Ge card only; not required on Eurogam VXI cards)
The pileup threshold must be adjusted so that it is slightly more negative than the noise. As well as a busy signal for pileup detection, it is also used as the gate for the baseline restorer, so incorrect adjustment can result in the shaping amplifier producing no output.
2.1.1) Connect the 4 MeV quasi-trapezoidal signal to one of the analogue inspection lines.
2.1.2) Connect the Pileup signal to one of the logic inspection lines.
2.1.3) Trigger the oscilloscope from the Pileup signal.
2.1.4) Set the pileup threshold in the noise (usually about 0 to -1000µV, but can be higher or lower for some shaping amplifiers).
2.1.5) Slowly make the pileup threshold more negative until the 4 MeV trace shows only the correct shaped pulse with no ghosting at 0v caused by triggering in noise. Typical setting is one or two more "clicks" of the slider after ghosting stops.
2.1.6) Repeat this procedure for each channel in each card, saving the results periodically in a setup file using the save/restore feature.
2.2) Pole Zero
The pole zero is adjusted using a software slider to optimize the shaped signal shape.
2.2.1) Connect the 4 MeV quasi-trapezoidal or quasi-triangular shaped signal from the channel under test to one of the analogue inspection lines with a gain of about 2mV/division.
2.2.2) Adjust the PZ slider until the overshoot/undershoot at the falling edge of the shaped pulse is minimised.
2.2.3) Repeat this procedure for each channel in each card, saving the results periodically in a setup file using the save/restore feature.
Note that for the quasi-trapezoidal shaping in the Cluster cards the PZ setting is crucial for good resolution and so should be verified by collecting a source spectrum and making fine adjustments if necessary to optimise the peak shape (symmetry).

2.3) Peak Detector Gates (Eurogam VXI cards only)
The quasi-triangular shapers in the EG phase 1 and Clover cards require a peak detector. The end of the peak detector gate is adjusted from software using a slider.
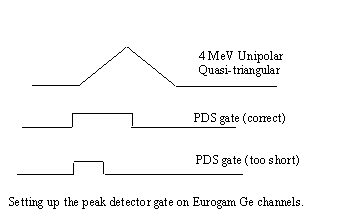
2.3.1) Connect the 4 MeV quasi-triangular shaped signal from the channel under test to one of the analogue inspection lines.
2.3.2) Connect the PDS gate signal to one of the logic inspection lines
2.3.3) Adjust the PDS gate width such that it extends beyond the peak of the shaped signal by between 500ns and 1µs.
2.3.4) Repeat this procedure for each channel in each card, saving the results periodically in a setup file using the save/restore feature. Usually the same setting can be propagated to all channels using the "act on all channels," button, but each channel must be checked visually as well.
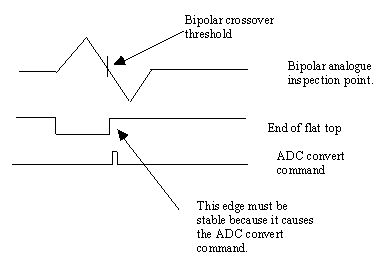
2.4) Bipolar Crossover Threshold (Cluster Ge cards only)
The bipolar crossover threshold should not need to be adjusted unless the rising edge of the End of Flattop inspection point is unstable. (This edge is used to start conversion, and its timing is determined by the bipolar crossover threshold whose default setting should be sufficient to avoid firing in noise.)
Appendix A:Cluster Ge card Controls and Inspection Lines
On the MIDAS (euroball-session) Cluster Ge channel window (in the VXI Module Setup menu) you will find the following controls:
Channel Defines the cluster detector
Segment Defines the crystal within the cluster detector
"act on all channels" affects one segment on all detectors
"act on all segments" affect all segments on one detector
"act on all segments" AND "act on all channels" affects all segments in all detectors.
Enable enables and disables the CFD. It is ANDed with VXI Go, so has no effect if the system is not enabled in the Experimental Control window.
TFA gain is normally set "high". Changing to "low" reduces the gain by a factor of 3.
PileUp/Anti-Compton defines what to do if the electronics detects either pre-pulse pileup or a veto from the escape suppression shield. The channel is either marked with qualifiers and left in the event ("mark"), or else the channel is reset and removed from the event ("reject").
The 3 parameters (4MeV, 20MeV and TAC) are controlled in the next part of the window. The item and group (Address) are displayed for information only: they cannot be changed from here.
The sliding scale correction for each parameter can be controlled from here. To turn on the sliding scale digital correction, tick "SS". Note that this controls only the digital correction: the analogue ramp must be turned off separately by writing directly to the Module Control Register at offset 0x10 from the card’s base address. The ramp control cannot be accessed from the euroball-session user interface.
The readout of each parameter may be enabled or disabled individually by ticking or un-ticking their RO bits.
The threshold should normally be set to 0 unless you wish to set a digital lower threshold on data for any parameter. ADCs whose values are under the threshold, or which are over-range, will not be included in readout regardless of the state of their RO tick.
CFD width adjusts the width of the CFD pulse’s contribution to the sumbus. Usually 50ns
CFD Delay is used to align the different segments and detectors so that all the CFD outputs drive the sumbus at the same time for the same event. The nominal value is 100ns which is then adjusted during system setup. The alignment should be checked at the trigger card so that it compensates for all cable delays as well as slight differences between detectors and electronics channels. CFD delay refers only to the output pulse, not the delay of the analogue pulse which is fixed at 50ns.
FT sample point is time at which the local trigger looks for the system’s Fast Trigger pulse. The delay starts from the time the CFD fires. FT sample should be set to be in the middle of the FT pulse.
Val sample is the time at which the local trigger looks for the system’s Validation pulse. The delay starts from the time the CFD fires. Val sample should be set to be in the middle of the Validation pulse.
LT watchdog is the time after which the LT decides that the readout has a fault and will not be sending a reset. It then resets itself. Full scale value is about 100µs, not 16µs as shown in software.
CFD Threshold is threshold used by the CFD. It is in the range 0 to 700keV for high TFA gain, and 0 to 2.6 MeV for low TFA gain.
Pole Zero is adjusted using the PZ adjustment while observing the 4 MeV unipolar output’s tail. Adjust this to avoid overshoot and undershoot. There is no typical value: it must be adjusted to match the pre-amp driving the input.
Pileup Threshold should be set to be a little more negative than the noise for the best results. It is also used as a gate for baseline restoration. Typical value is about -8000µV, but varies according to the detector and amplifier. NB if you set this threshold wrongly then in some cases you will get no data from the channel because it is also the BLR gate.
All inspection lines can be accessed from the Analogue and Digital inspection line menus. The voltage inspection lines may be either observed on an oscilloscope at the output of the resource manager, or else measured by the ADC in the resource manager if they are DC levels. Where lines are attached to other cards or other channels, the software displays the name, detector number and segment name of the signal source. If there is just a signal name, then the signal comes from the channel you’re displaying.
The electronics window shows the serial number and revision level from the GIR. This is not the same as the serial number of the analogue part of the Ge card which is marked on the front panel and the PCB.
Inspection Lines
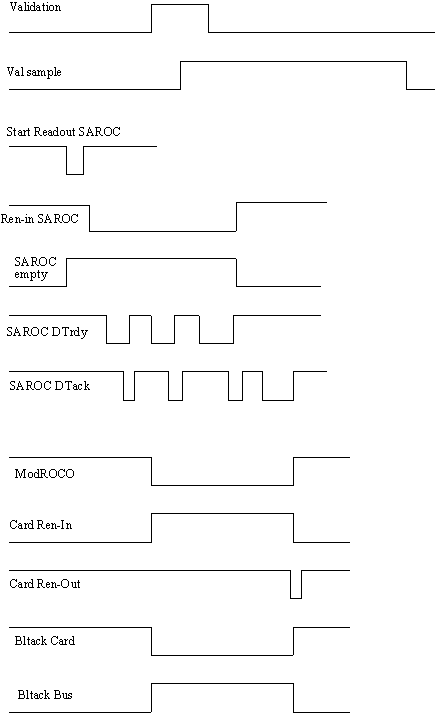
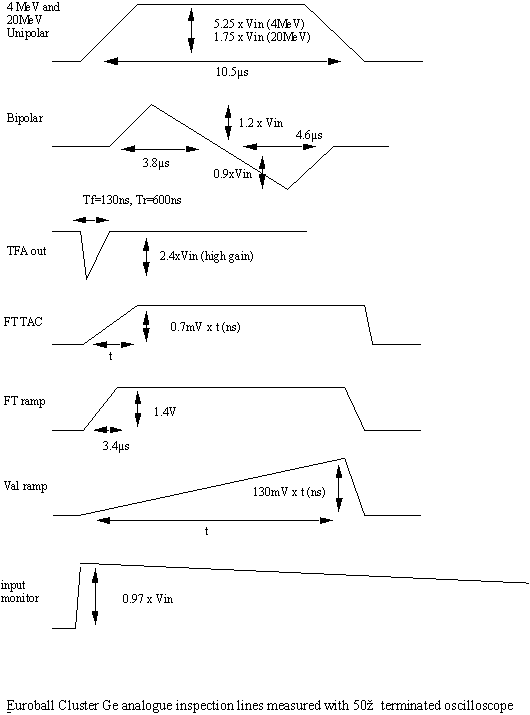
The following pages show traces from all the analogue and most of the logic inspection lines as they will appear on an oscilloscope connected to the AI and LI outputs of the VXI resource manager. Logic inspection lines which are of no interest to users have been omitted for the sake of brevity. All inspection lines must be terminated in 50Ω. The logic inspection lines use fast NIM levels.
For the analogue inspection lines, Vin refers to the input pulse height from the preamplifier when measured into a high (1M ohm) impedance ‘scope input.
Euroball Cluster Ge Logic Inspection Lines measured with 50Ω terminated oscilloscope